Salam semua,
Alhamdulillah, saya doakan kesihatan kita diperbaikkan lagi dan dirahmati oleh Allah S.W.T. .
Dengan ini, saya ingin membuat pemberitahuan, servis yang saya offer tersebut terpaksa ditanggungkan seketika kerana saya sedang berada diluar kawasan dan sedang mengikuti program ijazah saya.
Alhamdulillah juga, ramai yang menghubungi saya untuk mendapatkan servis yang telah tentera di blog/web saya ini tetapi ramai juga gagal untuk mendapatkannya. Namun bergitu, saya dapat membantu anda semua dengan menasihati cara-cara atau prosedure yang baik agar anda dapat melakukannya sendiri atau cadangan kedai-kedai yang bagus akan saya berikan.
Semoga Allah dapat membantu anda sekalian bagi mengharungi dang mencapai kejayaan pada masa yang akan datang. Saya, Owner website ini, ingin mengucapkan selamat hari raya aidiladha dan selamat menunaikan ibadah haji dan korban bagi yang melakukannya !!! Happy Holidays guys!!
Read more...
9/18/2015
11/20/2012
Change Windows 7 Key and Activate with new Windows 7 key
Hi, here again we discuss about the computer that need to change a new key product.
In this section, we scope it on the windows 7 only.
Sometimes, this need to do when:
Lets do it together:
1. Firstly, go to Start Menu and search "cmd", this will show command prompt result at the top as shown below:
2. Right Click on this cmd.exe or cmd icon and click Run As Administrator:
3. Type the following command:
slmgr.vbs /upk
this is for clear the previous key product.
after that
type : slmgr.vbs /ipk
this is update ur new product key.
example:
4. If you the above step correctly with a valid License Key for Windows 7, you will see a success message like the one below:
5. Now you need to activate Windows online. For this Go to Control Panel > System
On this screen you will find the link to activate Windows. Click on the link which says
“Activate Windows Now”
6. You will see a Windows Activation Window as seen below, select the Retype Product Key option:
7. Type the Windows key again in this window and it will start an online validation if you are connected to Internet.
8. Laslty, You will get a success message on activation on Windows.
Source :
So, if u need ask something that u dont understand, commend me here!
Read more...
In this section, we scope it on the windows 7 only.
Sometimes, this need to do when:
- You are updating from Windows 7 public beta to a licensed version of Windows
- You were having a copy of Windows 7 which was not genuine but you have now purchased a license and want to update the Windows 7 key
- You have any other need because of which you want to change Windows 7 key
Lets do it together:
1. Firstly, go to Start Menu and search "cmd", this will show command prompt result at the top as shown below:
2. Right Click on this cmd.exe or cmd icon and click Run As Administrator:
slmgr.vbs /upk
this is for clear the previous key product.
after that
type : slmgr.vbs /ipk
this is update ur new product key.
example:
4. If you the above step correctly with a valid License Key for Windows 7, you will see a success message like the one below:
5. Now you need to activate Windows online. For this Go to Control Panel > System
On this screen you will find the link to activate Windows. Click on the link which says
“Activate Windows Now”
6. You will see a Windows Activation Window as seen below, select the Retype Product Key option:
7. Type the Windows key again in this window and it will start an online validation if you are connected to Internet.
8. Laslty, You will get a success message on activation on Windows.
Source :
- hsolved-change-windows-7-key-and-activate-windows-7/
- How to Change windows 7 Product key
- http://tfy2012.blogspot.com/2012/06/how-to-change-windows-7-product-key.html
So, if u need ask something that u dont understand, commend me here!
Read more...
9/16/2012
Papago M9 for Samsung Galaxy SIII
hi everybody, I bought a new SGS3, and as usual , installing application is the first procedure to make phone come interesting be functioning. So, one of the important application is GPS software, I did a research and I found that PAPAGO! M9 is the suitable for my phone..
here is the step..
1.Go download all the things in this page : PAPAGO M9 Download! ..\
2.Copy all the NAviSea from the Happy folder after extracted it to phone folder.
3.Install the application first, then download the maps on this page: maps papago , and copy to the maps folder on the NaviSea folder.
4.And it will function.
5.adjust the resolution for SIII is in Resolution page .download and delete the old organic folder and replace the adjust folder into that folder.
So, that's it!!!!
resources :
:http://jiwang.org/mobile-share/232713-mf-papago-m9-android-mobile-x8-5-map-latest.html
:http://www.syok.org/new/showthread.php?684-MF-PAPAGO!-M9-for-Android-Mobile-X8-5-Map-%28Latest%29&p=76375&viewfull=1
:http://www.syok.org/new/showthread.php?684-MF-PAPAGO!-M9-for-Android-Mobile-X8-5-Map-%28Latest%29
:http://mygalaxywonder.blogspot.com/2012/05/papago-m9-for-any-android-phones.html
Read more...
here is the step..
1.Go download all the things in this page : PAPAGO M9 Download! ..\
2.Copy all the NAviSea from the Happy folder after extracted it to phone folder.
3.Install the application first, then download the maps on this page: maps papago , and copy to the maps folder on the NaviSea folder.
4.And it will function.
5.adjust the resolution for SIII is in Resolution page .download and delete the old organic folder and replace the adjust folder into that folder.
So, that's it!!!!
resources :
:http://jiwang.org/mobile-share/232713-mf-papago-m9-android-mobile-x8-5-map-latest.html
:http://www.syok.org/new/showthread.php?684-MF-PAPAGO!-M9-for-Android-Mobile-X8-5-Map-%28Latest%29&p=76375&viewfull=1
:http://www.syok.org/new/showthread.php?684-MF-PAPAGO!-M9-for-Android-Mobile-X8-5-Map-%28Latest%29
:http://mygalaxywonder.blogspot.com/2012/05/papago-m9-for-any-android-phones.html
Read more...
7/16/2012
How to know your game could play on your computer or not?
Everyone want to play game on their personal computer, but can the computer handle or specified the game on to the computer? So, I were like to share with viewer about this cool website.
Click link below;
Can your computer run that game?
This website was created to help us knowing the game requirement that will run on a computer. Suppose we as gamer like to know whether the game is either support or not. In this website, you will have to fill the option such as (1) Search a product by typing its name or select from the dropdown. (2) Click "Can you run it?".
So, this is easy. You just find your games and click the button (2). The result will show the game is suitable or not and the page also will recommend the requirement that need to play game on the computer.
First : You need to choose the game,
Second : Click the button after choosing,
Third : the website will analyze within few second,
Hope you will try it. =)
Read more...
2/02/2012
Using android phone through the computer for webcam
Those like to use their phone for making phone as medium for webcam by connection between phone and computer.
So, firstly u must have Android phone or tab and also computer, the computer should have Skype or Yahoo Messenger , if u don't have this, well, how u gonna turn on the webcam ,right?
Here is the steps;
Installation:
1. Install USB Webcam from Android Market or u can download from here. Turn on USB debugging (Settings->Application->Development->USB Debugging).
2. Download and Install the PC Host application below for Windows, by running the setup program. Download here too.
3. Make sure that the Phone USB driver is installed correctly. Follow the instructions by Google, or if you are experienced, in the device manager, install a driver for “ADB Interface” or similar. When prompted for the driver location, browse to the USB Webcam program directory. Also can Download here. If it installed correctly, under System Properties->Device Manager->Android Phone you should see Android Composite ADB Interface.
Next is how is work after step at above followed:
1. Plug your phone in via USB, and run the start menu program “USB Webcam”. Start USB Webcam on your phone.
2. Start Skype, for example. You should have a new webcam to choose in the settings pages. While the phone app is running, you should see a video feed. While the phone app is closed, a pink screen should show.
Resources :
*Placaware(Some random DIY computer projects)
*How to Use Your Droid as a Webcam
Ask me if u not much understand about it!
Read more...
View or Check who are stealing my Internet??
People nowadays are very professional with the new technology things such as Internet, Games, electronic devices and hack & crack something that important from the victims that innocent.
So, talk about the hack and crack, we as user that have Internet that provide from the services that we pay every month and those people that just hack or steal our connection with no ask our permission are kindly wrong and will stand for the justice.
So, here I like to show something or tool that can be use to check whether there a parasite or other user that we not define in modem.
Firstly, Download this .
next , open the zip file and Install it.
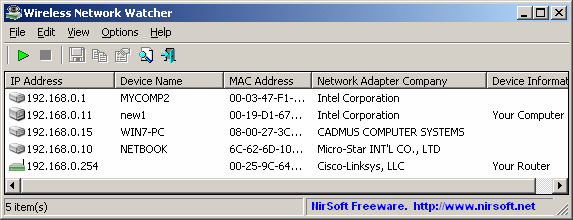
next, will show this:

For every computer or device that is connected to your network, the following information is displayed: IP address, MAC address, the company that manufactured the network card, and optionally the computer name.
You can also export the connected devices list into html/xml/csv/text file, or copy the list to the clipboard and then paste into Excel or other spreadsheet application.
Resource from:
*Wireless Network Watcher
*Netcut
Read more...
So, talk about the hack and crack, we as user that have Internet that provide from the services that we pay every month and those people that just hack or steal our connection with no ask our permission are kindly wrong and will stand for the justice.
So, here I like to show something or tool that can be use to check whether there a parasite or other user that we not define in modem.
Firstly, Download this .
next , open the zip file and Install it.
next, will show this:
Description
Wireless Network Watcher is a small utility that scans your wireless network and displays the list of all computers and devices that are currently connected to your network.For every computer or device that is connected to your network, the following information is displayed: IP address, MAC address, the company that manufactured the network card, and optionally the computer name.
You can also export the connected devices list into html/xml/csv/text file, or copy the list to the clipboard and then paste into Excel or other spreadsheet application.
System Requirements And Limitations
- This utility works on Windows 2000, Windows XP, Windows Server 2003/2008, Windows Vista, and Windows 7.
- This utility can only scan a wireless network that you're currently connected to. It cannot scan other wireless networks.
- In rare cases, it's possible that Wireless Network Watcher won't detect the correct wireless network adapter, and then you should go to 'Advanced Options' window (F9), and manually choose the correct network adapter.
- although this utility is officially designed for wireless networks, you can also use it to scan a small wired network.
Resource from:
*Wireless Network Watcher
*Netcut
Read more...
8/06/2011
TIps How to force install apps to SD card without Rooting.

Hi there, antara masalah yang di hadapi oleh pengguna android sekarang adalah mengalihkan applications or game dari memory hp ke dalam SD card hp tersebut. Link
Ini disebabkan oleh:
- memory phone terlalu penuh.
- semasa install apps or games, require untuk delete some apps or games yang da di installed di dalam memory phone.
- memerlukan untuk root or flash untuk mengalihkan pindahan ke SD card phone.
iaitu;
Bende paling penting:
1. anda perlu mula dengan enable USB debugging pada Android phone anda : "Settings > Applications > Development > USB debugging."
2. anda perlu download dan install the latest Android SDK on pada kompter anda dari: sini.
Tutorial :
1. Extract package ke folder pilihan anda [Katakanlah-C: / android-SDK-windows /], jalankan SDK Manager.exe
2. Tutup the command / windows command prompt window yang terbuka.
3. Di windows baru, klik pada Available Packages ke kiri. Untick semua pilihan yang anda akan diminta untuk memuat turun kecuali USB driver option. USB driver option perlu dan Addition package yang dipanggil xxx.revision 5 di bahagian atas senarai. Jadi, anda perlu memeriksa sebanyak 2 pilihan.
(Nota: Jika anda mendapat mesej ralat pada masa ini, membolehkan "Force https ... " dalam Tetapan. Dari senarai pakej yang tersedia, pilih "USB Driver package", klik pada butang Install Selected di kanan bawah sudut dan ikuti arahan.)
4. Jangan start bukak Samsung Kies.Sambung telefon anda ke komputer anda dengan USB-kabel. OS anda akan meminta anda untuk Install driver baru. Pilih untuk memasang mereka dari folder android-sdk-windows/extras/google/usb_driver.
Jangan mount phone anda, anda hanya perlu plug-in kabel sahaja.
5. Run Command prompt
Taip ;
"cd C:\android-sdk-windows\platform-tools"
"adb devices"
"adb shell"
Tanda $ akan keluar
"pm setInstallLocation 2"
keluar lagi Tanda $
dan BERJAYA. Tutup semua, cabut telefon, matikan telefon dan kemudian kembali semula .
Sumber / Resources : androidforums and wordpress .
p/s: Tengok lah link kat sumber2 tersebut, mungkin lebih paham dari tutorial saya bagi di sini..
:)
Read more...
7/01/2011
Rules of Third
Dalam capture pon ade menekan kn pasal law2 yg perlu bila mengambil sesuatu gamabar itu,
Rules of Third nie adalah pembahagian composition yg kita gunakan bila wat Landscape photography.
Teknik nie 'menyarankan' pembahagian antara permukaan muka bumi & langit di bahagi kepada nisbah 1:2 daripada 3 bahagian melintang (horizontal).
Rules of third juga boleh digunakan untuk menentukan composition (framing) atau memilih 'object of interest'
Perhatikan gambarajah di atas, permukaan pantai hanya mengambil sepertiga ketinggian gambar, manakala kawasan langit pula mengambil dua pertiga bahagian daripada ketinggian keseluruhan gambar.
Garisan Horizon adalah 'gambaran ilusi' mengenai sebuah garisan melintang dalam sesebuah gambar yg memisahkan di antara 'laut~langit' @ 'daratan~langit' dan sue dah tandakan dengan anak panah di bawah. Melalui kaedah Rules of Third, garisan horizon disyorkan 'seelok-eloknya' berada dalam keadaan 'garis lurus' dan bukan menyenget...
Sumber dari : Forum.cari
Read more...
Rules of Third nie adalah pembahagian composition yg kita gunakan bila wat Landscape photography.
Teknik nie 'menyarankan' pembahagian antara permukaan muka bumi & langit di bahagi kepada nisbah 1:2 daripada 3 bahagian melintang (horizontal).
Rules of third juga boleh digunakan untuk menentukan composition (framing) atau memilih 'object of interest'
Perhatikan gambarajah di atas, permukaan pantai hanya mengambil sepertiga ketinggian gambar, manakala kawasan langit pula mengambil dua pertiga bahagian daripada ketinggian keseluruhan gambar.
Garisan Horizon adalah 'gambaran ilusi' mengenai sebuah garisan melintang dalam sesebuah gambar yg memisahkan di antara 'laut~langit' @ 'daratan~langit' dan sue dah tandakan dengan anak panah di bawah. Melalui kaedah Rules of Third, garisan horizon disyorkan 'seelok-eloknya' berada dalam keadaan 'garis lurus' dan bukan menyenget...
Sumber dari : Forum.cari
Read more...
6/27/2011
DSLR - Storage
Penjagaan camera dan lens sangat diperlukan supaya items tersebut tidak mudah rosak,
Pelbagai cara untuk menjaga items tersebut dengan guide yang anda bole search di internet,
Apa itu kotak kering?
Satu kotak kering (@ kabinet kering) adalah sistem dehumidifying yang mengurangkan kelembapan (jumlah wap air di udara) dalam kotak. Penggunaan kotak kering pada dasarnya mencegah pertumbuhan kulat pada kamera anda / kanta dan juga memanjangkan jangka hayat peralatan anda.
Ada beberapa jenama terkenal di Malaysia:
1) AIPO
2) Eureka
3) Pelbagai
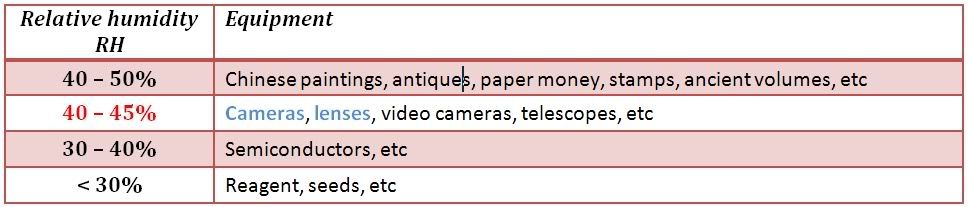
Tahap optimum kelembapan (RH) untuk DSLR anda perlu sekitar 40-45%. (Berbanding dengan persekitaran dalaman iaitu kira-kira 60% RH + (sehingga 80% + pada hari hujan!))
Sila lihat jadual di bawah:

Untuk lebih selamat, kerana perubahan itu + -1% dalam persekitaran, adalah disyorkan untuk RH kotak kering untuk - 42-43%
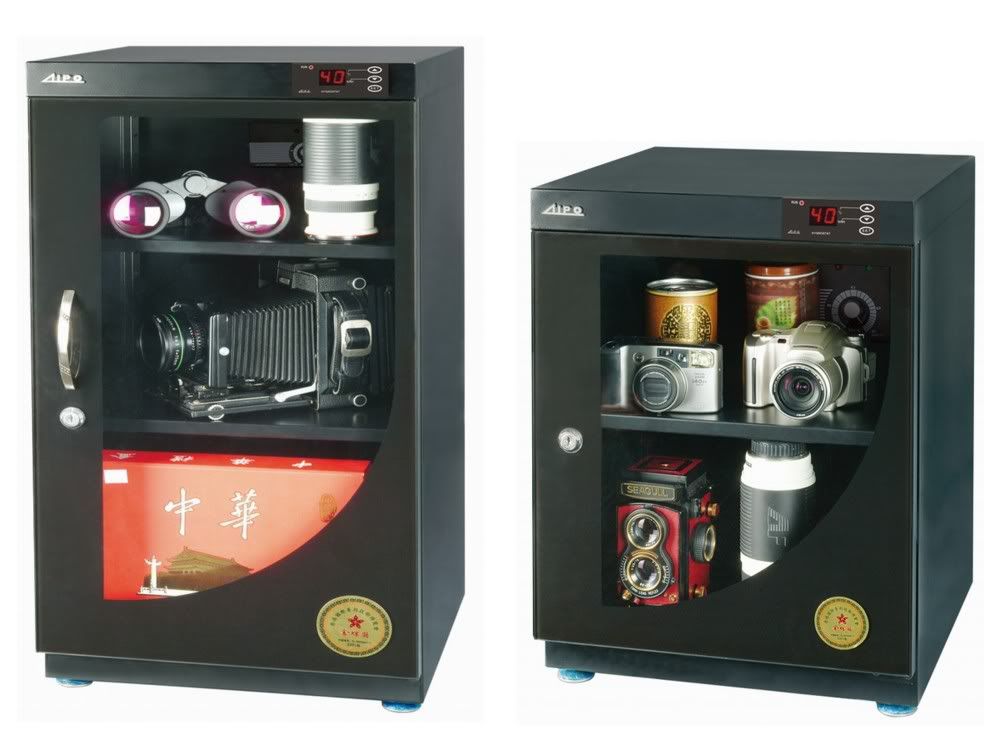
Berikut adalah beberapa gambar kotak kering:

Sila ambil perhatian bahawa kotak kering adalah lebih baik jika anda tidak menggunakan DSLR anda secara berkala. Jika anda menggunakan kamera anda dengan kerap (sekurang-kurangnya sekali seminggu), peluang untuk mendapatkan kulat di DSLR anda sesuatu yang luar biasa.
Apa yang begitu besar tentang pertumbuhan kulat?
Jika kulat tumbuh pada kanta anda, ia hanya boleh makan ke lapisan kanta dan menyebabkan kerosakan yang kekal dengan menggores ke kanta.
Jika anda pernah dilakukan lebih tanda-tanda pertumbuhan kulat, ia adalah penting untuk anda mendapatkan bantuan profesional secepat mungkin.
- Jika anda menangkap pertumbuhan kulat awal, unsur-unsur kanta boleh dibersihkan dan dibaiki rosak
- Jika terlambat, anda lebih kurang boleh mengatakan selamat tinggal kepada kanta anda.
Kerosakan ini tidak boleh diubah dan kekal, yang membawa kepada kualiti imej miskin apabila anda menembak gambar dengan kanta terjejas
Pertumbuhan kulat juga dikenakan ke atas sensor kamera anda.
Fakta mengenai kulat dan DSLR (5):
Keadaan yang paling sesuai untuk pertumbuhan kulat
1) tahap Kelembapan> 50%
- Kemuncak kadar yang semakin meningkat sekitar 70-90% kelembapan (yang merupakan tahap kelembapan biasa untuk iklim kita)
2) tempat Gelap
3) udara bertakung
4) Suhu antara 10-35 darjah celcius
Mudah dijangkiti tempat
Kamera beg 1)
Store bilik 2)
Penting: Jangan menyimpan DSLR anda dalam beg membawa anda sebagai beg simpanan. Melainkan anda tinggal di yang sangat kering, tempat rendah kelembapan, udara dan kelembapan bertakung hanya boleh menggalakkan pertumbuhan kulat.
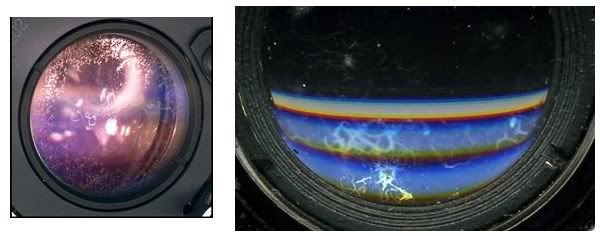
Ini adalah contoh kulat yang tumbuh pada kanta:

Bagaimana sekiranya saya tidak mampu kotak kering?
- Kebanyakan peminat akan mengatakan anda berbaring kerana anda mampu membeli DSLR a!
- Jika anda mendapat kelengkapan pertumbuhan kulat, kos servis dan pembaikan mungkin lebih daripada kos kotak kering.
Bagaimanapun, jika anda benar-benar tunai yang ketat dan tidak fikir kotak kering adalah perlu, terdapat beberapa alternatif untuk kering kotak.
a) Udara-ketat bekas + dehumidifier / dessicant pek (kotak DIY sendiri anda kering)
b) penyimpanan amalan Baik
c) mandi matahari kanta anda
d) Flash kanta menggunakan kilat kuat
a) Udara-ketat bekas + dehumidifier / dessicant pek
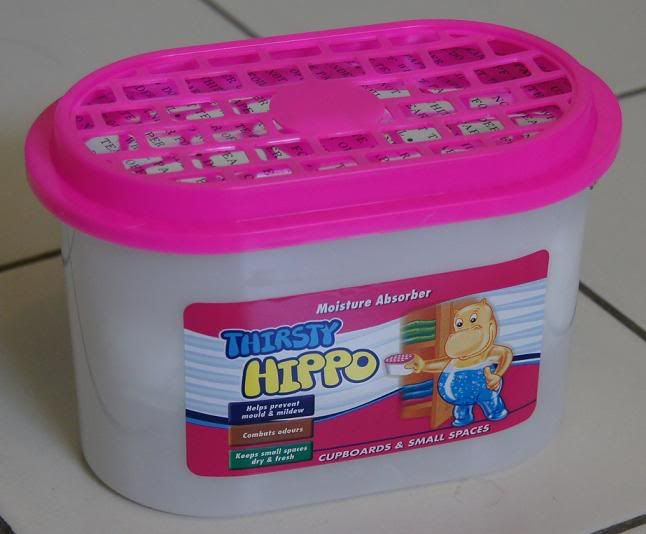
Satu alternatif yang lebih murah adalah untuk membeli bekas kedap udara dan dehumidifier seperti itu "Thirsty Hippo" atau silika dessicant pek / gel.
Ini alternatif murah tidak mahal tetapi dalam jangka panjang (lebih beberapa tahun), ia mungkin menambah sehingga jumlah besar wang yang dibelanjakan.
Satu lagi alternatif yang lebih baik menggunakan "guna semula" gel paket Silika yang biasanya dijual oleh kedai-kedai kamera. Barang-barang ini boleh dikitar semula dengan memanaskan mereka dalam ketuhar.
Inilah yang Thirsty Hippo kelihatan seperti:

Silika gel:

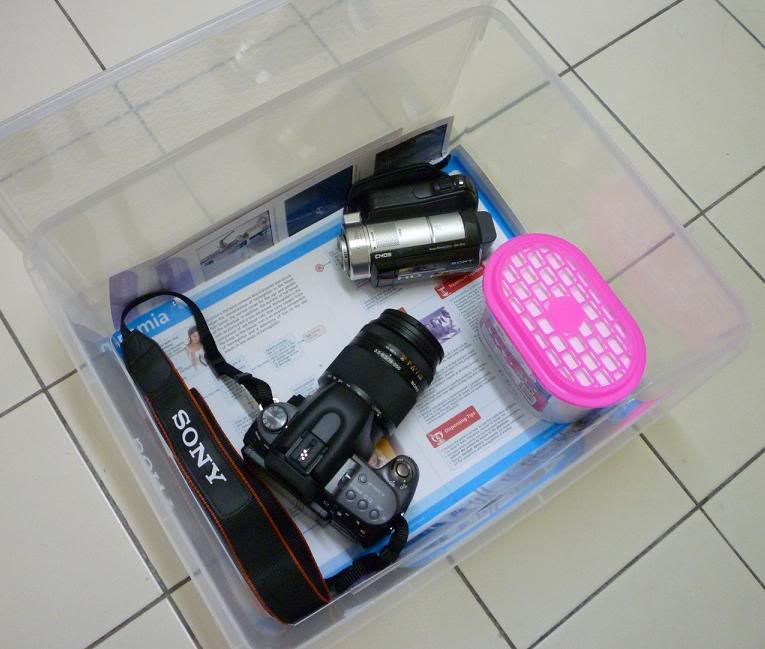
Berikut adalah sementara saya adat buatan DIY kotak kering:

Terdapat beberapa masalah dengan kaedah ini:
1) Tahap kelembapan dalam kotak itu akan dikawal dan Spesies dahaga mungkin menghisap terlalu banyak kelembapan. Ini boleh membuat meterai getah di DSLR anda menjadi keras dan retak.
- Satu cara untuk mengurangkan risiko ini adalah untuk membuka kotak yang kerap, mungkin seminggu sekali (atau lebih kerap)
2) Anda perlu menggantikan dehumidifier / dessicants kerap bergantung kepada berapa lama mereka lepas
3) Untuk penggunaan jangka panjang (dari segi tahun), anda mungkin menghabiskan wang dekat dengan atau di atas kos kotak yang kering kecil
b) penyimpanan amalan Baik
Hanya jika anda tidak menggunakan drybox dan tidak menggunakan kaedah kedap udara bekas, ia adalah penting untuk mempunyai amalan baik untuk penyimpanan peralatan anda:
1) Jangan simpan dalam kegelapan (kedai contohnya dalam kabinet kaca memastikan banyak cahaya secara tidak langsung / terus)
2) Pastikan kabinet mempunyai baik udara aliran
3) Jauhkan sejauh mungkin dari kulit atau kayu tidak bersalut
? Jangan simpan dengan penapis UV di tempat (sebagai cahaya UV dari matahari akan membunuh kulat ada)
c) mandi matahari kanta anda
Ya, betul. Anda boleh mandi matahari kanta anda (TIDAK badan kamera:! Peluh:)
Cahaya UV akan membunuh kulat (ingat untuk mengambil penapis UV anda!)
Berikut adalah cara anda melakukannya:
- Tempat di bawah matahari
- Lensa sahaja (TIDAK lampirkan badan kamera)
- Sekali seminggu (mungkin?)
- Tempoh?
Kelemahan
- Mungkin kering getah lebih cepat (mengurangkan jangka hayat dengan membuat getah keras dan retak)
- Boleh menggalakkan penghijrahan gris dalam kanta yang boleh membawa kepada minyak pada bilah aperture
Penting: Kaedah ini jarang diamalkan dan umumnya tidak bercakap tentang di forum fotografi. Adakah ia atas risiko anda sendiri dan saya tidak akan dipersalahkan atas sebarang kerosakan! Lebih baik buat kotak DIY sendiri kering. : P
d) Flash kanta menggunakan kilat kuat
Flash kanta - menggunakan kilat kuat contohnya f42, f58
Menjana haba yang membunuh kulat
Berikut adalah cara anda melakukannya:
- Acu pistol flash anda terus ke dalam kanta (tanpa badan yang dilampirkan)
- 2-3 berkelip sudah cukup untuk membunuh atau memperlahankan pertumbuhan kulat
- Sekali seminggu (mungkin?)
- Kononnya lebih selamat daripada mandi matahari tetapi kurang berkesan
Penyimpanan - kanta atau mematikan?
Sebenarnya, tidak kira jika anda meninggalkan kanta pada atau menanggalkannya. Walau bagaimanapun, adalah dinasihatkan supaya kanta pada kerana sebab-sebab berikut:
1) DSLR anda sedia untuk digunakan sebaik sahaja anda mengambil ia keluar
2) Ada peluang kurang memperkenalkan debu ke dalam kamera semasa proses kanta lampiran / penyingkiran
Subseksyen tambahan
Sememangnya, anda tidak perlu meletakkan DSLR anda di bawah panas matahari atau di dalam kereta anda di bawah matahari yang untuk tempoh masa yang lama kerana ia boleh merosakkan kamera atau kanta anda.
Dinyatakan dalam manual DSLR saya:
Langkah berjaga-jaga
Jangan gunakan / kedai kamera di tempat berikut:
- Di satu tempat yang sangat panas, kering atau lembap. Di tempat seperti di dalam kereta yang diletakkan di bawah matahari, badan kamera boleh menjadi shocking.gif cacat dan ini boleh menyebabkan kerosakan.
Walaupun dengan kotak kering - jika menembak dalam keadaan ekstrem seperti menembak hari hujan (RH 90 +), tepi pantai - juga boleh mandi matahari.
Sumber dari ForumLowyat.net
antara yang saya buat untuk kamera saya:
Read more...
Pelbagai cara untuk menjaga items tersebut dengan guide yang anda bole search di internet,
Apa itu kotak kering?
Satu kotak kering (@ kabinet kering) adalah sistem dehumidifying yang mengurangkan kelembapan (jumlah wap air di udara) dalam kotak. Penggunaan kotak kering pada dasarnya mencegah pertumbuhan kulat pada kamera anda / kanta dan juga memanjangkan jangka hayat peralatan anda.
Ada beberapa jenama terkenal di Malaysia:
1) AIPO
2) Eureka
3) Pelbagai
Tahap optimum kelembapan (RH) untuk DSLR anda perlu sekitar 40-45%. (Berbanding dengan persekitaran dalaman iaitu kira-kira 60% RH + (sehingga 80% + pada hari hujan!))
Sila lihat jadual di bawah:
Untuk lebih selamat, kerana perubahan itu + -1% dalam persekitaran, adalah disyorkan untuk RH kotak kering untuk - 42-43%
Berikut adalah beberapa gambar kotak kering:
Sila ambil perhatian bahawa kotak kering adalah lebih baik jika anda tidak menggunakan DSLR anda secara berkala. Jika anda menggunakan kamera anda dengan kerap (sekurang-kurangnya sekali seminggu), peluang untuk mendapatkan kulat di DSLR anda sesuatu yang luar biasa.
Apa yang begitu besar tentang pertumbuhan kulat?
Jika kulat tumbuh pada kanta anda, ia hanya boleh makan ke lapisan kanta dan menyebabkan kerosakan yang kekal dengan menggores ke kanta.
Jika anda pernah dilakukan lebih tanda-tanda pertumbuhan kulat, ia adalah penting untuk anda mendapatkan bantuan profesional secepat mungkin.
- Jika anda menangkap pertumbuhan kulat awal, unsur-unsur kanta boleh dibersihkan dan dibaiki rosak
- Jika terlambat, anda lebih kurang boleh mengatakan selamat tinggal kepada kanta anda.
Kerosakan ini tidak boleh diubah dan kekal, yang membawa kepada kualiti imej miskin apabila anda menembak gambar dengan kanta terjejas
Pertumbuhan kulat juga dikenakan ke atas sensor kamera anda.
Fakta mengenai kulat dan DSLR (5):
Keadaan yang paling sesuai untuk pertumbuhan kulat
1) tahap Kelembapan> 50%
- Kemuncak kadar yang semakin meningkat sekitar 70-90% kelembapan (yang merupakan tahap kelembapan biasa untuk iklim kita)
2) tempat Gelap
3) udara bertakung
4) Suhu antara 10-35 darjah celcius
Mudah dijangkiti tempat
Kamera beg 1)
Store bilik 2)
Penting: Jangan menyimpan DSLR anda dalam beg membawa anda sebagai beg simpanan. Melainkan anda tinggal di yang sangat kering, tempat rendah kelembapan, udara dan kelembapan bertakung hanya boleh menggalakkan pertumbuhan kulat.
Ini adalah contoh kulat yang tumbuh pada kanta:
Bagaimana sekiranya saya tidak mampu kotak kering?
- Kebanyakan peminat akan mengatakan anda berbaring kerana anda mampu membeli DSLR a!
- Jika anda mendapat kelengkapan pertumbuhan kulat, kos servis dan pembaikan mungkin lebih daripada kos kotak kering.
Bagaimanapun, jika anda benar-benar tunai yang ketat dan tidak fikir kotak kering adalah perlu, terdapat beberapa alternatif untuk kering kotak.
a) Udara-ketat bekas + dehumidifier / dessicant pek (kotak DIY sendiri anda kering)
b) penyimpanan amalan Baik
c) mandi matahari kanta anda
d) Flash kanta menggunakan kilat kuat
a) Udara-ketat bekas + dehumidifier / dessicant pek
Satu alternatif yang lebih murah adalah untuk membeli bekas kedap udara dan dehumidifier seperti itu "Thirsty Hippo" atau silika dessicant pek / gel.
Ini alternatif murah tidak mahal tetapi dalam jangka panjang (lebih beberapa tahun), ia mungkin menambah sehingga jumlah besar wang yang dibelanjakan.
Satu lagi alternatif yang lebih baik menggunakan "guna semula" gel paket Silika yang biasanya dijual oleh kedai-kedai kamera. Barang-barang ini boleh dikitar semula dengan memanaskan mereka dalam ketuhar.
Inilah yang Thirsty Hippo kelihatan seperti:
Silika gel:
Berikut adalah sementara saya adat buatan DIY kotak kering:
Terdapat beberapa masalah dengan kaedah ini:
1) Tahap kelembapan dalam kotak itu akan dikawal dan Spesies dahaga mungkin menghisap terlalu banyak kelembapan. Ini boleh membuat meterai getah di DSLR anda menjadi keras dan retak.
- Satu cara untuk mengurangkan risiko ini adalah untuk membuka kotak yang kerap, mungkin seminggu sekali (atau lebih kerap)
2) Anda perlu menggantikan dehumidifier / dessicants kerap bergantung kepada berapa lama mereka lepas
3) Untuk penggunaan jangka panjang (dari segi tahun), anda mungkin menghabiskan wang dekat dengan atau di atas kos kotak yang kering kecil
b) penyimpanan amalan Baik
Hanya jika anda tidak menggunakan drybox dan tidak menggunakan kaedah kedap udara bekas, ia adalah penting untuk mempunyai amalan baik untuk penyimpanan peralatan anda:
1) Jangan simpan dalam kegelapan (kedai contohnya dalam kabinet kaca memastikan banyak cahaya secara tidak langsung / terus)
2) Pastikan kabinet mempunyai baik udara aliran
3) Jauhkan sejauh mungkin dari kulit atau kayu tidak bersalut
? Jangan simpan dengan penapis UV di tempat (sebagai cahaya UV dari matahari akan membunuh kulat ada)
c) mandi matahari kanta anda
Ya, betul. Anda boleh mandi matahari kanta anda (TIDAK badan kamera:! Peluh:)
Cahaya UV akan membunuh kulat (ingat untuk mengambil penapis UV anda!)
Berikut adalah cara anda melakukannya:
- Tempat di bawah matahari
- Lensa sahaja (TIDAK lampirkan badan kamera)
- Sekali seminggu (mungkin?)
- Tempoh?
Kelemahan
- Mungkin kering getah lebih cepat (mengurangkan jangka hayat dengan membuat getah keras dan retak)
- Boleh menggalakkan penghijrahan gris dalam kanta yang boleh membawa kepada minyak pada bilah aperture
Penting: Kaedah ini jarang diamalkan dan umumnya tidak bercakap tentang di forum fotografi. Adakah ia atas risiko anda sendiri dan saya tidak akan dipersalahkan atas sebarang kerosakan! Lebih baik buat kotak DIY sendiri kering. : P
d) Flash kanta menggunakan kilat kuat
Flash kanta - menggunakan kilat kuat contohnya f42, f58
Menjana haba yang membunuh kulat
Berikut adalah cara anda melakukannya:
- Acu pistol flash anda terus ke dalam kanta (tanpa badan yang dilampirkan)
- 2-3 berkelip sudah cukup untuk membunuh atau memperlahankan pertumbuhan kulat
- Sekali seminggu (mungkin?)
- Kononnya lebih selamat daripada mandi matahari tetapi kurang berkesan
Penyimpanan - kanta atau mematikan?
Sebenarnya, tidak kira jika anda meninggalkan kanta pada atau menanggalkannya. Walau bagaimanapun, adalah dinasihatkan supaya kanta pada kerana sebab-sebab berikut:
1) DSLR anda sedia untuk digunakan sebaik sahaja anda mengambil ia keluar
2) Ada peluang kurang memperkenalkan debu ke dalam kamera semasa proses kanta lampiran / penyingkiran
Subseksyen tambahan
Sememangnya, anda tidak perlu meletakkan DSLR anda di bawah panas matahari atau di dalam kereta anda di bawah matahari yang untuk tempoh masa yang lama kerana ia boleh merosakkan kamera atau kanta anda.
Dinyatakan dalam manual DSLR saya:
Langkah berjaga-jaga
Jangan gunakan / kedai kamera di tempat berikut:
- Di satu tempat yang sangat panas, kering atau lembap. Di tempat seperti di dalam kereta yang diletakkan di bawah matahari, badan kamera boleh menjadi shocking.gif cacat dan ini boleh menyebabkan kerosakan.
Walaupun dengan kotak kering - jika menembak dalam keadaan ekstrem seperti menembak hari hujan (RH 90 +), tepi pantai - juga boleh mandi matahari.
Sumber dari ForumLowyat.net
antara yang saya buat untuk kamera saya:
Read more...
Nikon D5100
Huhu, Kita berhenti sekejap untuk komputer dan kita sambung cita pasal DSLR..
Apa itu Dslr????
=Digital Single Lens Reflex,, maksudnya, menggunakan Chip untuk take a photo, dan menggunakan single lens untuk melihat dan shoot!!
Dan DSLR bermaksud mahal woo nak beli,,, kalo banyak duit je le beli... hahha...
now,
citer pasal My new Nikon D5100,
Aku beli masa 9/5/2011 aritu di Queensbay Mall ,, Dengan harga 2400.
Dia bagi Bag, brush lens, uv filter lens, 8Gb memory card.
sedikit review,,
kamera nie baru kuar pada 05-04-2011,,(baru lagi tu..)
1. A high-resolution Nikon DX-format CMOS image sensor with an effective pixel count of 16.2-million pixels, an image-processing engine that provides superior image quality and rich expression of tones, and the new High Dynamic Range (HDR) function
The D5100 is equipped with the same DX-format CMOS image sensor and EXPEED 2 image-processing engine as the high-end D7000 digital-SLR camera. These features enable capture of high-resolution images with excellent expression of tones. With standard sensitivity settings of ISO 100 - 6400 and additional increases up to Hi 2 (ISO 25600 equivalent), the camera offers improved capability with shooting under dim lighting, such as in the evening or indoors, and also produces better results with capture of rapidly moving subjects.
The High Dynamic Range (HDR) function captures two shots of varying exposure each time the shutter-release button is pressed, and then combines the two shots into a single image with a broad dynamic range. Resulting images beautifully recreate the scene as seen with the naked eye, even with shooting of backlit scenes, with little or no loss of detail in shadows or highlights.
HDR Sample Image
2. 3-in., approximately 921k-dot vari-angle monitor with wide viewing angle and increased visibility
Visibility has been increased with the large 3-inch, approximately 921k-dot high-resolution vari-angle monitor adopted for the D5100. In addition, the range of colors that can be reproduced by the monitor is equivalent to that of the sRGB gamut.
Adoption of a side hinge for the vari-angle monitor prevents the monitor from hitting the tripod when it is opened while the camera is mounted on a tripod. The vari-angle monitor opens from 0 to 180° to the side, and can be rotated up to 90° clockwise and up to 180° counter-clockwise when it is open. This enables shooting from a wide variety of angles, from low to high, making even self portraits possible.
Vari-angle monitor movement diagram
3. D-Movie for recording and editing of Full-HD movies
The D5100 is equipped with the D-Movie function that enables recording of high-definition movies (1920 x 1080p, 30p) exhibiting superior video quality. Autofocusing during movie recording is possible using contrast-detect AF. When the focus mode is set to full-time-servo AF (AF-F) and the AF-area mode to subject-tracking AF, the camera automatically maintains focus on a subject moving throughout the frame. The D5100 also offers in-camera movie editing functions that allow users to save a single frame as a still JPEG image or delete unnecessary portions from the beginning and/or end of movie files. What's more, the D5100 is equipped with built-in support for stereo audio recording via the Stereo Microphone ME-1 (available separately), and the mode dial and live view switch have been positioned on the same spindle in consideration of operational ease.
Mode dial, live view switch image(s)
The optional Stereo Microphone ME-1 can be used to record sound in stereo while also preventing noise caused by lens vibration being recorded during autofocus.
4. The first Nikon digital-SLR camera to offer Special Effects mode
The D5100 offers special effects that can be selected and applied with both shooting of still images and recording of movies. Special effects are displayed with the view through the lens in the monitor before shooting or recording begins, allowing users to confirm the desired results in real time. Users can easily enjoy adding special effects to movies. This mode was adopted to respond to the creative intent of users searching for a way to express their own unique style and creativity.
The Special Effects mode built into the D5100 offers seven special effects, including Selective Color and Color Sketch.
Favorite Special Effects
Additional Features and Functions
1 Manual focus, M or S mode, shutter speed 1/250 s or faster, and other settings at default values
more about it? Click Here tau!
Ha, nie ada video pasai D5100 and other kamera naa..
Read more...
Apa itu Dslr????
=Digital Single Lens Reflex,, maksudnya, menggunakan Chip untuk take a photo, dan menggunakan single lens untuk melihat dan shoot!!
Dan DSLR bermaksud mahal woo nak beli,,, kalo banyak duit je le beli... hahha...
now,
citer pasal My new Nikon D5100,
Aku beli masa 9/5/2011 aritu di Queensbay Mall ,, Dengan harga 2400.
Dia bagi Bag, brush lens, uv filter lens, 8Gb memory card.
sedikit review,,
kamera nie baru kuar pada 05-04-2011,,(baru lagi tu..)
1. A high-resolution Nikon DX-format CMOS image sensor with an effective pixel count of 16.2-million pixels, an image-processing engine that provides superior image quality and rich expression of tones, and the new High Dynamic Range (HDR) function
The D5100 is equipped with the same DX-format CMOS image sensor and EXPEED 2 image-processing engine as the high-end D7000 digital-SLR camera. These features enable capture of high-resolution images with excellent expression of tones. With standard sensitivity settings of ISO 100 - 6400 and additional increases up to Hi 2 (ISO 25600 equivalent), the camera offers improved capability with shooting under dim lighting, such as in the evening or indoors, and also produces better results with capture of rapidly moving subjects.
The High Dynamic Range (HDR) function captures two shots of varying exposure each time the shutter-release button is pressed, and then combines the two shots into a single image with a broad dynamic range. Resulting images beautifully recreate the scene as seen with the naked eye, even with shooting of backlit scenes, with little or no loss of detail in shadows or highlights.
2. 3-in., approximately 921k-dot vari-angle monitor with wide viewing angle and increased visibility
Visibility has been increased with the large 3-inch, approximately 921k-dot high-resolution vari-angle monitor adopted for the D5100. In addition, the range of colors that can be reproduced by the monitor is equivalent to that of the sRGB gamut.
Adoption of a side hinge for the vari-angle monitor prevents the monitor from hitting the tripod when it is opened while the camera is mounted on a tripod. The vari-angle monitor opens from 0 to 180° to the side, and can be rotated up to 90° clockwise and up to 180° counter-clockwise when it is open. This enables shooting from a wide variety of angles, from low to high, making even self portraits possible.
3. D-Movie for recording and editing of Full-HD movies
The D5100 is equipped with the D-Movie function that enables recording of high-definition movies (1920 x 1080p, 30p) exhibiting superior video quality. Autofocusing during movie recording is possible using contrast-detect AF. When the focus mode is set to full-time-servo AF (AF-F) and the AF-area mode to subject-tracking AF, the camera automatically maintains focus on a subject moving throughout the frame. The D5100 also offers in-camera movie editing functions that allow users to save a single frame as a still JPEG image or delete unnecessary portions from the beginning and/or end of movie files. What's more, the D5100 is equipped with built-in support for stereo audio recording via the Stereo Microphone ME-1 (available separately), and the mode dial and live view switch have been positioned on the same spindle in consideration of operational ease.
The optional Stereo Microphone ME-1 can be used to record sound in stereo while also preventing noise caused by lens vibration being recorded during autofocus.
4. The first Nikon digital-SLR camera to offer Special Effects mode
The D5100 offers special effects that can be selected and applied with both shooting of still images and recording of movies. Special effects are displayed with the view through the lens in the monitor before shooting or recording begins, allowing users to confirm the desired results in real time. Users can easily enjoy adding special effects to movies. This mode was adopted to respond to the creative intent of users searching for a way to express their own unique style and creativity.
The Special Effects mode built into the D5100 offers seven special effects, including Selective Color and Color Sketch.
Favorite Special Effects
- Selective color
All colors other than those selected by the user are recorded in black and white. Up to three colors can be selected at a time.
- Selective color sample image
- Color sketch
The camera detects and colors outlines for a color sketch effect. Users can use the monitor display to adjust the vividness of colors and the thickness of outlines. - Miniature effect
Distant subjects appear as miniatures for a diorama effect. Users can choose the orientation (vertical/horizontal) and width (narrow/normal/wide) of the area that will be in focus. - Night vision
When this option is selected, extremely high ISO sensitivities are used (up to ISO 102400 equivalent). This enables shooting under conditions of darkness while verifying the subject and composition in the monitor.
* RAW recording is not possible. Still images can only be recorded in JPEG (black-and-white) format. Only contrast-detect AF can be used.
Additional Features and Functions
- High-speed continuous shooting at up to approximately 4 fps1, and a very precise and durable shutter unit that has passed testing for 100,000 cycles.
- Equipped with Quiet shutter-release mode for shooting in situations in which quieter shutter operation is desired. Infrared receivers for remote control operation on the front and back of the camera enable wireless control over the shutter from both in front of and behind the camera (optional ML-L3 wireless remote control supported).
- Equipped with 16 scene modes that enable the simple capture of beautiful photos of the desired scene with automatic optimisation of camera settings.
- Built-in HDMI-CEC compatibility enables control over playback of still images and movies using the television's remote control when the camera is connected to a high-definition TV via the HDMI connector.
1 Manual focus, M or S mode, shutter speed 1/250 s or faster, and other settings at default values
more about it? Click Here tau!
Ha, nie ada video pasai D5100 and other kamera naa..
Read more...
12/04/2010
Format windows 7 or vista using pendrive
Apa yang best menggunakan cara ini adalah, dapat format dengan lebih laju dalam masa 15minit nya,,
Ini juga baik untuk laptop or computer yang x de CD/DVD - ROM drive..
U should have:
USB Flash Drive (minimum 4GB)
windows 7 or vista
Step
------
1 plug the usb pendrive and back up data yang ada pada pendrive,
2 open commad prompt or ( Start button + R) or open RUN and type "cmd"
3 next,
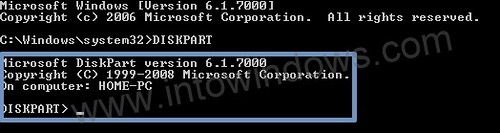
Type "DISKPART" and enter.
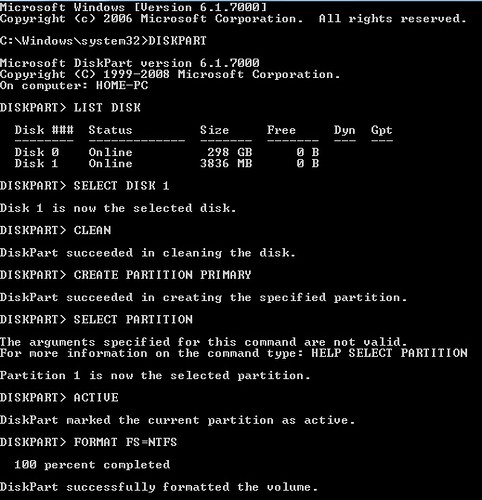
3.1 see which one is your disk that want to format by type "list disk" and it will appear it.
4 pilih la Disk yang mana korang nak format(pendrive yang diguna untuk format)
Type "Select Disk 1" jika (Disk 1 itu adalah pendrive yang digunakan untuk format)
5 follow and type sampai ke bawah:
"CLEAN"
"CREATE PARTITION PRIMARY"
"SELECT PARTITION 1"
"ACTIVE"
"FORMAT FS=NTFS"
(Format process may take few seconds)
"ASSIGN"
"EXIT"

Step Seterusnya:
-----------------
1. Command Prompt juga ( Start button + R) or open RUN and type "cmd"
2. Type "xcopy x:\*.* /s /e /f y:\"
x=DVD disk atau image of windows 7 or vista
y=pendrive yang digunakan untuk format
3. Tunggu sampai habis copy complete.
Then success....
view:

Kalau x faham jugak bole pergi ke link nie:
Step 1: clean and make boot
Step 2: copy data from DVD windows 7 or vista
Read more...
Ini juga baik untuk laptop or computer yang x de CD/DVD - ROM drive..
U should have:
USB Flash Drive (minimum 4GB)
windows 7 or vista
Step
------
1 plug the usb pendrive and back up data yang ada pada pendrive,
2 open commad prompt or ( Start button + R) or open RUN and type "cmd"
3 next,
Type "DISKPART" and enter.
4 pilih la Disk yang mana korang nak format(pendrive yang diguna untuk format)
Type "Select Disk 1" jika (Disk 1 itu adalah pendrive yang digunakan untuk format)
5 follow and type sampai ke bawah:
"CLEAN"
"CREATE PARTITION PRIMARY"
"SELECT PARTITION 1"
"ACTIVE"
"FORMAT FS=NTFS"
(Format process may take few seconds)
"ASSIGN"
"EXIT"
Step Seterusnya:
-----------------
1. Command Prompt juga ( Start button + R) or open RUN and type "cmd"
2. Type "xcopy x:\*.* /s /e /f y:\"
x=DVD disk atau image of windows 7 or vista
y=pendrive yang digunakan untuk format
3. Tunggu sampai habis copy complete.
Then success....
view:
Kalau x faham jugak bole pergi ke link nie:
Step 1: clean and make boot
Step 2: copy data from DVD windows 7 or vista
Read more...
Windows Gadget blank and cannot working properly
Hey,
mesti kadang2 korang ada masalah tiba2 windows gadget blank or x boleh guna..
so disini, aku nak berkongsi sedikit ilmu for u all,,
memperkenalkan software malwarebyte,,
Malwarebytes adalah sebuah laman web yang didedikasikan untuk memerangi malware. Malwarebytes telah mengembangkan berbagai alat yang dapat mengenalpasti dan menghapuskan perisian berbahaya dari komputer anda.
Ketika komputer anda menjadi dijangkiti, Malwarebytes dapat memberikan bantuan yang diperlukan untuk menghilangkan jangkitan dan mengembalikan OS kembali ke prestasi yang optimum.
kadang2, kite download2 software ke game ke,, kadang2 ada malware nie lebih kurang macam virus..
Link :malwarebytes
Masalah di dunia komputer yang banyak pengguna miliki adalah startup lambat. Semua orang ingin tahu cara untuk mempercepat proses startup mereka. Tentu saja, ada banyak penyelesaian untuk masalah ini, bagaimanapun, Malwarebytes telah mencipta cara yang selamat, mudah, dan efisien untuk menghilangkan aplikasi ini yang tidak perlu yang bermula apabila anda menghidupkan komputer anda - StartUpLite.
antara masalah yang berlaku...:
Read more...
mesti kadang2 korang ada masalah tiba2 windows gadget blank or x boleh guna..
so disini, aku nak berkongsi sedikit ilmu for u all,,
memperkenalkan software malwarebyte,,
Malwarebytes adalah sebuah laman web yang didedikasikan untuk memerangi malware. Malwarebytes telah mengembangkan berbagai alat yang dapat mengenalpasti dan menghapuskan perisian berbahaya dari komputer anda.
Ketika komputer anda menjadi dijangkiti, Malwarebytes dapat memberikan bantuan yang diperlukan untuk menghilangkan jangkitan dan mengembalikan OS kembali ke prestasi yang optimum.
kadang2, kite download2 software ke game ke,, kadang2 ada malware nie lebih kurang macam virus..
Link :malwarebytes
Masalah di dunia komputer yang banyak pengguna miliki adalah startup lambat. Semua orang ingin tahu cara untuk mempercepat proses startup mereka. Tentu saja, ada banyak penyelesaian untuk masalah ini, bagaimanapun, Malwarebytes telah mencipta cara yang selamat, mudah, dan efisien untuk menghilangkan aplikasi ini yang tidak perlu yang bermula apabila anda menghidupkan komputer anda - StartUpLite.
antara masalah yang berlaku...:
Read more...
11/26/2010
Unlock Core
Kepada Pengguna yang menggunakan motherboard Asus Latest chipset and Southbrige seperti AMD 870/SB850 , AMD 890/SB850 , dan sewaktu dengannya,
Di sini, I try to guide u how to setup unlock core cpu,
First step:
Korang mesti ade :
- AMD Phenom II x2 AMD Phenom II x3, Phenom x4 II (dengan T di akhir nombor model mereka seperti 960T), Athlon II (dengan kod melangkah Cacad), atau AMD Phenom II x2
- Motherboard :
- Advanced Clock Calibration (ACC macam pada motherboard SB710 & SB750.)
- Core Unlocker, Turbo Unlocker (atau nama lain yang diberikan kepada motherboard oleh product untuk menggantikan ACC yang tidak hadir dalam Seri SB800.)
- NVCC (macam pada beberapa siri 7 nForce dan semua motherboard siri nForce 9.)
- Sedikit keberuntungan (arguably bahagian yang paling penting.)
Ini aku bagi contoh aku nya mobo ,
ASUS M4A870TD/USB3
ada dua cara nak unlock core cpu,
1st= gune unlocker switch button yang ada pada mobo,
2nd=gune bios setup,
GUNE UNLOCKED CORE SWITCH BUTTON
=swtich on unlcoker core cpu switch button
=bios masuk je, terus tekan "4"
=nanti, die reboot dan die bagi tahu korang dapat ke x unlock core cpu korang
GUNE SETUP BIOS
=first skali, g kat advance and pilih cpu configuration.
=kat situ, korang akan nampak, pasal unlocked core, just enable kn semua skali..
=nanti reboot, ada je die bagi tahu korang dapat ke x unlock core cpu korang
kalo ade problem x bole naik jugak, korang kene naikkan voltage core = 1.4v and Voltage cpu/nb(northbrige) = 1.3v..
sebagai contoh,
STEP 1: Masukkan senarai pilihan Cell Menu di BIOS |
STEP 2: Aktifkan fungsi Unlock CPU Core |
STEP 3: Aktifkan ACC (Advanced Clock Calibration) fungsi, dan, pada masa ini, anda akan melihat dua senarai inti awalnya akan menjadi empat teras senarai dengan pilihan menghidupkan / mematikan sejumlah Core 2 |
Pada masa ini, walaupun Core 1 tidak dapat dimatikan, semua core lain mempunyai pilihan yang dihidupkan / dimatikan, tetapi harus salah satu dari teras tidak stabil, pengguna mungkin tidak dapat memulakannya dengan OS, dan sistem boleh bahkan crash. |
STEP 5: Jika core akan dibuka berjaya, pengguna boleh cuba memasuki sistem maklumat dan mendapati bahawa apa yang pertama kali CPU dual-core telah berkembang menjadi teras-quad, dan prestasi yang telah sangat meningkat. |
Video dari ASUS Chip 800 series
Conclusion nye,

aku dpt naik satu core je, haha.. knp ae?
maybe yg ag satu core susah nak on...
Read more...
HAF 922
Sebenarnya, da lame minat casing nie, sbb die ada macam2 ciri yg aku nak, air cooling system yg bagus, luas dan lebar, kipas macam2 size boleh letak... dan casing nie po bole letak liquid cooling system.. fuyooo,, bole high end casing nie kalo aku modi...
Harga HAF 922 nie = RM339 jer,,
so, berbalaoi la, kalo nak power ag , HAF 932 or HAF X.
Specification:
| Available Color | Black |
| Dimension (W / H /D) | Main: 253 x 502 x 563 mm / 10.0 x 19.7 x 22.2 inches Box: 285 x 550 x 605 mm / 11.2 x 21.7 x 23.8 inches |
| Weight | Net Weight: 8.7 / 10.9 kg Gross Weight: 19.2 / 24.0 lbs |
| Material | Steel + Plastic and Mesh Bezel |
| Motherboards | ATX / Micro-ATX |
| 5.25" Drive Bay | 5 Exposed (one could convert to 3.5" drive bay) |
| 3.5" Drive Bay | 5 Hidden 1 Exposed (converted from one 5.25" drive bay) |
| I/O Panel | USB 2.0 x 2, MIC x 1, Audio x 1 (supports HD / AC97 Audio), eSATA x 1 |
| Cooling System | Front: 200 mm fan x 1 Red LED on / off fan x 1 / 700 RPM / 19 dBA (can be swap for 120 / 140 mm fan x 1) Top: 200 mm fan x 1 / 700 RPM / 19 dBA (can be swap to 120 mm fan x 2 ) Rear: 120 mm fan x 1 / 1200 RPM / 17 dBA Bottom: 120 / 140 mm fan x 1 (optional) Side: 200 mm fan x 1 (optional) (can be swap for 120 mm fan x 2) |
| Expansion Slots | 7 + 1 |
| Power Supply | ATX PS2 / EPS 12V (optional) |
| Optional Component | Transparent Acrylic Side Panel |
Review:
Front to up view
Review yg D modi punye:
Read more...
Subscribe to:
Posts (Atom)